All
-
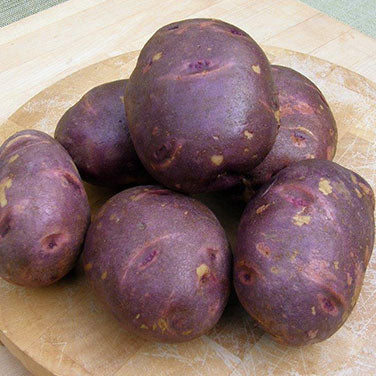
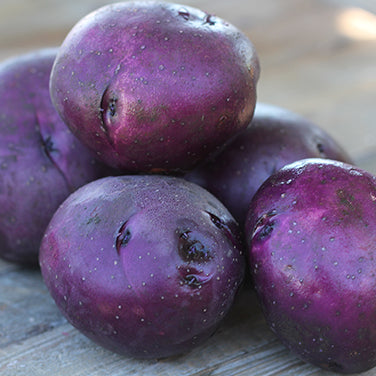
Heirloom Viking
These are truly beautiful potatoes: large, round in shape, with a rich, dark purple skin lightly dappled with pink splashes and stripes. Inside, the fine-textured, firm flesh is creamy white, smooth, and truly delicious. Heirloom Viking was first introduced almost 60 years ago by the potato improvement program at North Dakota State University.
Viking tubers always cook up meaty and moist with a rich, sweet, buttery flavor. In taste tests, our potato loving family rated them better tasting than “Yukon” types! They are great eating, whether you bake, mash or cut them up to roast up crisp in the oven. This high-yielding and reliable variety has good scab resistance. You'll want to grow this tasty all-purpose potato every season. Viking is an excellent keeper in storage.
Early: 64-78 days / Type: Determinate
1 lb. bag (plants a 10 foot row)
Mix and match your own potato patch:
Save 10% when you buy any 3 varieties or more!
Discount taken at checkoutRegular price $19.95Sale price $19.95Unit price per -
Our Gardening Hat
This is the hat that we grab in the morning and never take off all day, all summer. Sometimes you hardly know this ultralight, breathable 2.2 oz hat is on!
With its strategically placed ventilation panels and wicking sweatband you don’t get too hot. The 4 inch crescent brim protects from sun, but tapers for great peripheral vision and the dark under brim absorbs glare. Made of 100% nylon, with an ultraviolet protection factor of 50+, the hat strongly resists stains and repels water.
The 5 inch neck sun cape protects your neck from sun; when not needed, it folds back into the hat and you won’t know it’s there. Easy sliding back strap adjusts for a perfect fit. Hidden pony tail opening for long hair. The slender but strong chinstrap for windy days folds away when not needed.Regular price $38.50Sale price $38.50Unit price per -
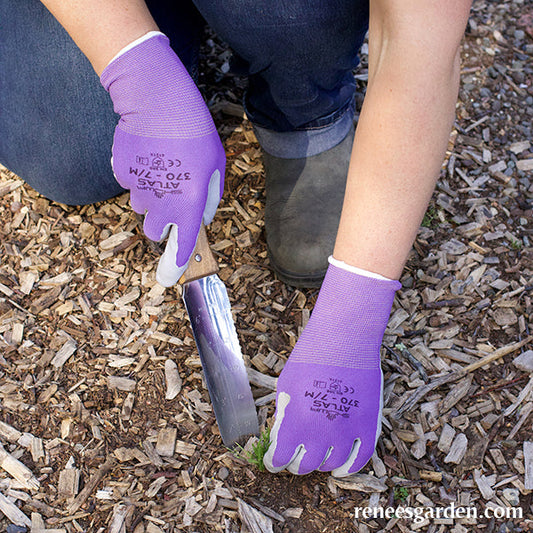
Stainless Steel Hori-Hori Digging Tool
Our FAVORITE "go to" tool for a multitude of everyday gardening tasks; trials manager Lindsay carries and uses her Hori Hori every single day. Its polished, top quality stainless steel blade has 2 working edges: a serrated sawing edge and a cutting edge. The Hori Hori is perfect for all kinds of digging (In Japanese, Hori Hori means “dig dig”), sowing seed, planting seedlings, transplanting, every kind of weeding chore, and easy harvesting.
You’ll find the convenient inch marking on its blade invaluable for sowing seeds at just the right depth. The tool easily digs out deep tap roots and the blade’s serrated edge literally scrapes weeds right out of the soil. Better than any trowel, the Hori Hori is perfect to dig holes, cut sod and divide perennials. When harvesting, it cleanly pops out root vegetables like potatoes and beets or cuts squash and pumpkins from the vine.
Regular price $38.95Sale price $38.95Unit price per -
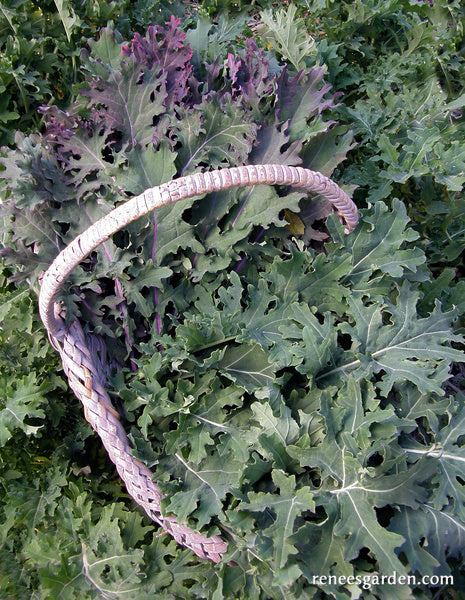
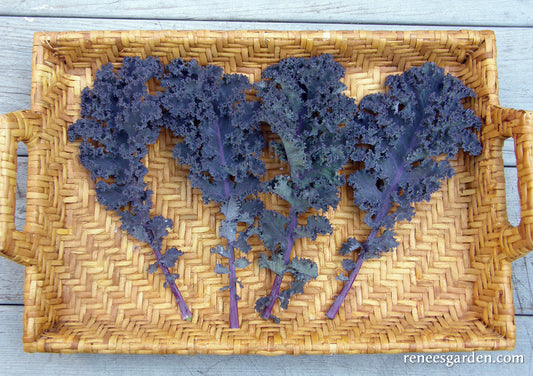
Heirloom Russian Kale Wild Garden Frills
TO START DIRECTLY IN THE GARDEN
As soon as ground can be worked in spring, prepare a well-drained, fertile garden bed in full sun. Sow seeds 2 inches apart in rows 12 to 18 inches apart. Cover 1/2 inch deep and keep soil evenly moist to ensure good germination. Sow again in late summer for another cold-hardy crop.
TO START INDOORS
Sow seeds in a container of seed starting mix 2 inches apart and cover 1/2 inch deep. Keep moist and provide a strong light source until seedlings are 3 to 4 inches tall then plant outdoors. Space 10 to 12 inches apart so plants have room to mature.
GROWING NOTES
Kale tastes best in cool weather so sow spring crops early. If sown in late summer, kale will yield through fall and winter except in the coldest climates. Frost actually enhances kale leaves’ color, flavor and sweetness. Mulch to retain moisture in summer and before the ground freezes to protect the roots of fall crops.
HARVEST AND USE
Begin harvesting outer leaves when plants have 6 to 8 leaves. Vitamin-rich kale is delicious in hearty winter soups, stews and sautés; or braise the beautiful leaves with garlic and olive oil in traditional Mediterranean style. Pull and discard once plants begin to bloom since the leaves of flowering stalks get tough and bitter.
Regular price $4.89Sale price $4.89Unit price per -
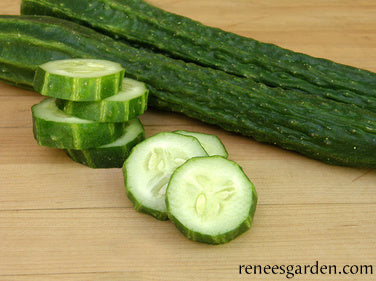
Heirloom Chinese Cucumber Suyo Long
START SEEDS OUTDOORS
Plant heat loving cucumbers only when weather is warm and settled and night temperatures stay above 50° F (10° C). Amend soil well with aged manure or compost. Sow in groups of 2 to 3 seeds 18 in. apart and 1 inch deep.
When seedlings are 2 in. tall, thin out extras, leaving one strong seedling per group. After thinning, put 4–5 ft. vertical supports or individual tomato cages around each seedling and train vines up supports as they grow. This method makes it easier to harvest straight fruits, saves garden space, and helps prevent further disease.
GROWING NOTES
Protect seedlings from marauding birds with plastic berry baskets, removing before plants get crowded. Shallow-rooted vines need adequate and consistent moisture to produce sweet tasting, nicely formed cucumbers. Avoid overly wet or dry periods for good quality fruits.
HARVEST AND USE
Cut rather than pull fruits from vines before seeds are large inside. Harvest every few days for longest fruit production. These juicy tender cucumbers need no peeling. Slice and enjoy for refreshing snacks, in salads and sandwiches. Eat cucumbers within a day or two of picking for best taste and quality.
Regular price $4.89Sale price $4.89Unit price per -
Huckleberry Gold: The First Low Glycemic Potato!
This is an exciting new variety, developed at the University of Idaho. Huckleberry Gold is not only exceptionally high in antioxidants, but this great tasting potato also has a lower glycemic index than other potato varieties. That means anyone watching their carbohydrate intake can literally have their potatoes and eat them too. Read article about Low Glycemic Potatoes
Nutritious Huckleberry Gold yields abundant round to oval medium-size tubers with purple skin and rich flavored, golden yellow flesh that really does taste already buttered. They are wonderful roasted, baked or boiled till tender.
You'll also love them cut into wedges, toss with olive oil, roast at high heat till crispy on the outside and creamy inside. Strong yielding, good keepers with good resistance to common scab and Verticillium wilt.
Midseason: 85-95 days / Type: Determinate
1 lb. bag (plants a 10 foot row)
Mix and match your own potato patch:
Save 10% when you buy any 3 varieties or more!
Discount taken at checkoutRegular price $19.95Sale price $19.95Unit price per -
Gourmet Kale Purple Moon
TO START DIRECTLY IN THE GARDEN
As soon as ground can be worked in spring, plant in well-drained, fertile garden soil in full sun. Sow groups of 3 seeds each 10-12 inches apart and 1/2 inch deep, in rows 12-18 inches apart. Keep soil evenly moist. When seedlings are 3 inches tall, thin to just 1 seedling per group. Sow again in late summer.
TO START INDOORS
Sow seeds 2 in. apart and 1/2 in. deep in a container of seed starting mix. Keep moist and provide a strong light source until seedlings reach 3 to 4 in. tall, then plant outdoors 10 to 12 in. apart.
GROWING NOTES
Kale tastes best in cool weather, so sow spring crops early. A late summer-sown crop will yield through fall and winter except in the coldest climates. Frost actually enhances kale leaf color, flavor and sweetness. Mulch to retain moisture in summer and before the ground freezes to protect the roots of fall crops.
HARVEST AND USE
Begin harvesting outer leaves when plants have 6 to 8 leaves. Vitamin-rich kale is delicious with stems removed and leaves cut in very thin strips for fresh salads with nuts and fruit. Braise with garlic and olive oil in traditional Mediterranean style. Enjoy in hearty winter soups, stews and sautés. Pull and discard once plants begin to bloom as flowering plants get tough and bitter.
Regular price $4.89Sale price $4.89Unit price per -
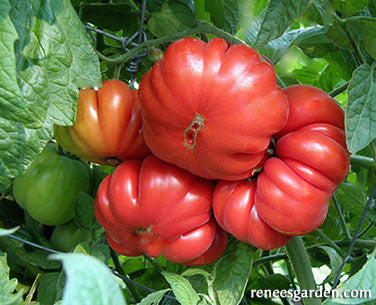
Italian Heirloom Tomato Costoluto Genovese
STARTING SEEDLINGS
In early spring, start indoors about 6 to 8 weeks before outdoor night temperatures are reliably in the 50-55°F (10-13°C). Sow seeds 1/4 inch deep and 1 inch apart in a container of seed starting mix. Keep moist but not soggy, and very warm, 80°F (27°C). Provide a strong light source until seedlings are ready to plant outside.
When 2 inches tall, transplant into individual 4-inch pots, burying stems up to base of leaves. Maintain at 70-75°F (21-24°C). Feed with half-strength fertilizer every 2 weeks until ready to plant, then gradually acclimate seedlings to outdoor conditions. When nights reach 55°F (10°C), transplant 3 feet apart into rich soil in full sun.
GROWING NOTES
Prepare soil well with aged manure or compost. Plant several inches deeper than seedlings were growing in containers. Provide strong stakes or tall wire cages at planting time. Mulch to provide even moisture retention; don’t overwater once fruit begins to ripen.
HARVEST AND USE
For best flavor, pick red-ripe and don’t store in the refrigerator. These tender, juicy, plump tomatoes have a naturally “pleated” shape. Slice thickly and show off their scalloped edges. Drizzle with good olive oil, a pinch of coarse salt, pepper and chopped fresh dill or basil. Enjoy!
Regular price $4.89Sale price $4.89Unit price per -
Certified Organic Lion's Mane Mushroom Growing Kit
This nutritional powerhouse produces plump, dense, puffy clusters that look like shaggy little clouds. Lion’s Mane’s flavor and consistency is characterized as mildly crab or lobster-like; substitute it in crab cake recipes! We enjoy them cut up, tossed in olive oil and coated in Panko breadcrumbs then roasted until crispy.
You can also slice them into rounds, sauté in olive oil or butter and use as a delicious sandwich filling. Because it contains brain-supporting compounds, Lion’s Mane is also a popular medicinal mushroom used for teas and tinctures.
This well-crafted growing kit has easy to follow instructions and contains everything you need for plentiful certified organic Lion’s Mane mushrooms.
Regular price $29.95Sale price $29.95Unit price per -
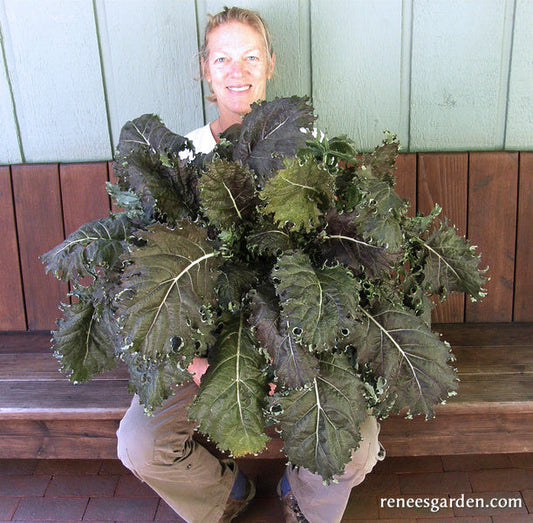
Specialty Kale Mars Landing
TO START DIRECTLY IN THE GARDEN
As soon as ground can be worked in spring, prepare a well-drained, fertile garden bed in full sun. Sow groups of 3 seeds each 10-12 inches apart and 1/2 inch deep, in rows 12-18 inches apart. Keep soil evenly moist. When seedlings are 3 inches tall, thin to just 1 seedling per group. Sow again in late summer for another cold-hardy crop.
TO START INDOORS
Sow seeds in a container of seed starting mix 2 inches apart and cover 1/2 inch deep. Keep moist and provide a strong light source until seedlings are 3 to 4 inches tall then plant outdoors.
THIN OR TRANSPLANT
Space 10 to 12 inches apart so plants have room to mature.
GROWING NOTES
Kale tastes best in cool weather so sow spring crops early. A late summer-sown crop will yield through fall and winter except in the coldest climates. Frost actually enhances kale leaves’ color, flavor and sweetness. Mulch to retain moisture in summer and before the ground freezes to protect the roots of fall crops.
HARVEST AND USE
Begin harvesting outer leaves when plants have 6 to 8 leaves. Vitamin-rich kale is delicious in hearty winter soups, stews and sautés; or braise the beautiful leaves with garlic and olive oil in traditional Mediterranean style. Pull and discard once plants begin to bloom since the leaves of flowering stalks get tough and bitter.
Regular price $3.69Sale price $3.69Unit price per -
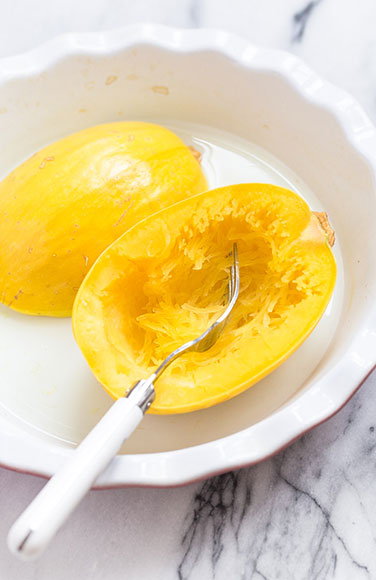
Winter Squash Baby Spaghetti
BEST TO START OUTDOORS
Winter squash needs full sun, rich fertile soil and warm temperatures. Wait to plant until temperatures stay above 50°F (10°C) day and night. Sow groups of 2 to 3 seeds 2 feet apart and 1 inch deep in rows 4 feet apart. Thin to 1 strong seedling per group. Or make slightly mounded hills 2 to 3 feet across and 6 feet apart and plant 4 to 5 seeds in each hill. When seedlings have several sets of leaves, thin to the strongest 3 seedlings per hill.
GROWING NOTES
Protect young seedlings from marauding birds by covering with plastic berry baskets at sowing time, removing before plants get crowded. To make picking easier and save space, vines can be trained up trellises or tepees.
HARVEST AND USE
All winter squashes need to mature properly, so wait to pick until rinds are fully colored up from dark green to bright yellow-orange. and tough enough to resist piercing with a fingernail and vines have died back. Then cut, leaving a good stem handle. Let them cure for 10 days in the sun, then store in a cool dry place and they’ll keep for months.
In the kitchen, cut Baby Spaghettis in half and scoop out the seeds, then bake until tender. Fork up the spaghetti-like strands of tender, nutty squash, then top with your favorite sauce or a dollop of butter and a sprinkle of salt.
Regular price $3.99Sale price $3.99Unit price per -
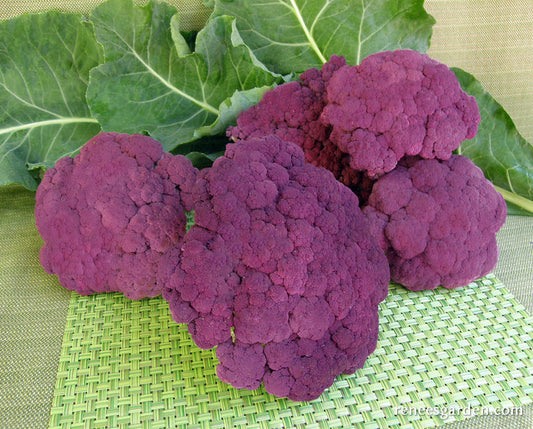
Cauliflower Purple Crush
BEST TO START INDOORS
Start seeds 4 to 5 weeks before last expected frost. Sow 1 inch apart in a container of seed starting mix and cover 1/4 inch deep. Keep moist but not soggy. Provide a strong light source until seedlings are ready to plant out. When seedlings have 2 to 3 sets of true leaves, acclimate to outdoor conditions and transplant 12 to 18 inches apart into rich, well-drained soil in full sun. In mild winter climates, sow again in mid-summer for a fall crop.
TO START OUTDOORS
About 4 to 6 weeks before last frost, sow groups of 2 to 3 seeds 12 to 18 inches apart and 1/4 inch deep in well-drained, fertile soil in full sun. Tend carefully and thin to 1 strong seedling per group when several inches tall. Proper thinning is critical for successful heads.
GROWING NOTES
Fertilize growing cauliflower every three weeks and keep well weeded and watered to provide the rapid growth cauliflower requires to form good heads. Purple Crush’s outer wrapper leaves help shield its heads from sun discoloration. Harvest the deep purple heads promptly when fully filled out. Nontoxic “BT” (Bacillus thuringiensis) products work well to control caterpillar pests.
HARVEST AND USE
Enjoy Purple Crush in salads, with dips, or break into florets and lightly steam or toss with olive oil and oven roast till tender. Remember: garden fresh cauliflower cooks more quickly than store-bought!
Regular price $4.99Sale price $4.99Unit price per -
Bush French Filet Beans Rolande
START SEEDS OUTDOORS
In spring, once weather is warm and settled and night temperatures stay above 55°F (13°C), plant seeds in well-worked, fertile soil in full sun. Poke seeds in 1 inch deep and 4 inches apart in rows 1 1/2 to 2 feet apart. Make successive sowings several weeks apart until the end of June to provide long continued harvests.
GROWING NOTES
Tender, crispy garden beans are an easy reliable crop to grow, but don’t plant seeds too early as cold conditions prevent good germination. If first sowing comes up unevenly, replant right away; new seedlings will catch up quickly. Birds are often attracted to young bean seedlings, so watch carefully and protect with netting or floating row covers if necessary. Avoid cultivating plants or picking pods when plants are wet.
HARVEST AND USE
Pick these fine flavored French gourmet beans more often than other bean varieties; at least every other day. They should be full size, but still very slender and no thicker than a pencil. The more you pick, the more plants will produce. Steam or sauté them quickly, just until tender-crisp and serve simply to fully enjoy their tempting flavor.
Regular price $4.39Sale price $4.39Unit price per -
Certified Organic Blue Oyster Mushroom Growing Kit
Nutty tasting and mild, Blue Oyster mushrooms are versatile in the kitchen. Their savory umami flavor and velvety texture seems to boost the flavors of just about any other ingredient.
These reliable producers offer several flushes of beautiful blue-gray mushrooms you can enjoy in stir-fries, pastas, roasted and sautéed vegetables, egg dishes, soups and stews. We love to chop them roughly and quickly sauté with butter, a bit of finely chopped garlic and plenty of broad leaf parsley – yum!
This well-crafted growing kit has easy to follow instructions and contains everything you need for plentiful certified organic Blue Oyster mushrooms.
Regular price $29.95Sale price $29.95Unit price per -
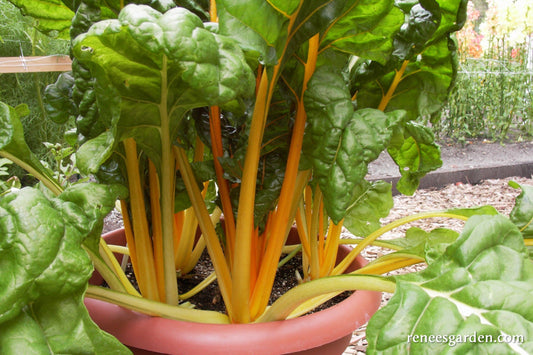
Container Chard Pot of Gold
EASIEST TO START OUTDOORS
For container sowing, use pots at least 12 inches in diameter and 12 inches deep and start with fresh potting mix. Plant seed in spring, after danger of frost is over, and/or again in mid-summer for fall harvests. Sow seed 1/2 inch deep and 1 inch apart in full sun. Keep evenly moist.
When seedlings are several inches tall, gradually thin to 8 inches apart in containers and use the delicious thinnings for early greens. Be sure to thin seedlings well so the large, vase-shaped plants have room to mature. If planting in garden beds, thin seedlings to stand 12 inches apart.
GROWING NOTES
Easy to grow chard can be grown year-round in mild winter areas. It prefers full sun, but will tolerate afternoon shade. Water regularly, checking containers daily in hot weather. Feed these fast-growing, productive plants weekly with a good high-nitrogen fertilizer. Watch for snails and slugs.
HARVEST AND USE
Begin harvesting when plants are well established and have 6 to 8 stalks. Both the crunchy succulent stalks and leaves make great eating. Break stems off at the base of the plant, always leaving at least 3 to 4 stalks to allow for regrowth. Chard is delicious sautéed, steamed, braised or stirfried. It pairs beautifully with the flavors of olive oil, garlic and lemon.
Regular price $3.39Sale price $3.39Unit price per -
Bonus Pack Texas Bluebonnets
Annual USDA Zones 5-8
Bluebonnets require full sun and well-drained ordinary soil of moderate alkalinity. They will not tolerate heavy clay soils, so if you have dense clay soil, grow them in raised beds amended with compost and sand to give them the good drainage they need. Bluebonnets are drought-adapted; do not overwater them during active growing periods.HOW BLUEBONNETS GROW AND WHAT THEY NEED
Bluebonnet’s large, hard-coated seeds respond best to late summer/fall planting as exposure to winter soil abrasion. Precipitation and weather changes break down the naturally tough outer coat of the seeds to produce germination in fall or early spring. As spring breaks, plants respond to sun and warmth, and then bloom gloriously, attracting happy bees and butterflies. The beautiful flower spikes are deep blue with white tips. After flowering, seedpods form, dry and drop seed to rebloom the next season.
SOWING AND GROWING BLUEBONNETS
Plant seeds in late summer or early fall to overwinter and bloom the next spring (in hard winter areas, sow in very early spring). Plant in ordinary garden soil, preparing the soil by removing weeds, grass and stones. Evenly loosen the top 4 inches of soil with a shovel or digging fork and break up soil clumps, then rake smooth.
Broadcast the seed over the seed bed, aiming for 6 inch spacing. Cover lightly with soil, tamping it down to make sure the seeds get good soil contact. Water in well at planting time, then keep moist but on the dry side until seasonal rains take over. Seeds may take 3 to 4 weeks to slowly and unevenly germinate. Foliage rosettes of 5-7 leaves will develop close to the ground and overwinter that way. (If cold weather comes on, seeds may delay germination until the next spring.) After germination, seedlings develop long tap roots and usually don’t require additional irrigation.
In mild early spring weather, bluebonnets will actively begin growing again. Plants rapidly develop multiple 8-12 inch flowering stalks that bloom in a gorgeous blue color with white tips. After the colorful flowers fade, green seedpods form. When they are dried up and dark brown, pods pop open and drop seed to self-sow for next spring’s flowers.
Regular price $9.99Sale price $9.99Unit price per -
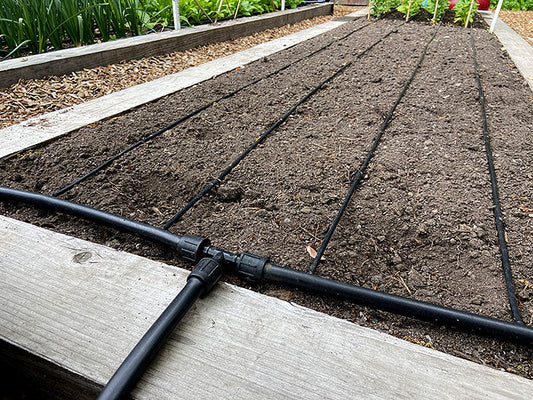
The Best Drip Irrigation Kit For Garden Beds
Top-Quality, Reliable, Easy to Install and Use
Even longtime gardeners can be intimidated by drip irrigation systems, but this well-made kit is the answer; it is truly a one-stop solution for watering! Everything you need for installing drip irrigation in two to three 4’ x 8’ raised beds is included.
Once assembled, you’ll have targeted, automatic watering that allows you to conserve water while providing accurate irrigation, so your veggies, flowers and herbs grow and produce steadily. We highly recommend choosing the optional timer, so you won’t have to babysit your irrigation ever again.
Kit includes: 50' of mainline tubing, 50' of micro tubing, 100' of dripline, home garden filter, PSI pressure regulator and all the hardware and hold-downs needed for two or three 4 x 8’ raised beds. Optional hose bib timer waters on the days and hours you designate. Instructions included, see complete parts list below.
Regular price From $109.95Sale price From $109.95Unit price per -
Ornamental Gourds Wings and Warts
STARTING SEEDS
To start seeds early: Several weeks before last spring frost date, sow 2 seeds each, 1 inch deep, in individual pots of potting mix. Keep warm and moist and provide a strong light source. When seedlings are well-established and outside temperatures are above 50°, pinch to one plant per pot and acclimate them to outdoor conditions. Transplant seedlings at sunny garden edges to ramble or 12 inches apart along a sturdy fence or trellis to form a lush canopy.
Start seeds outdoors: only in areas with a very long growing season. Plant after night temperatures stay above 50°. In full sun, sow seeds 1 inch deep and 6 inches apart in rows 4 feet apart. Thin seedlings to final spacing 1 foot apart. Or, plant 6 to 8 seeds in hills 8 feet apart, thinning to 3 or 4 per hill and allowing vines to ramble or grow them up fences, trellises or tepees.
GROWING NOTES
Gourds need full sun, very rich fertile soil and warm temperatures. For earliest and best yields, hand-pollinate gourds: break off a blooming male flower and dust pollen onto fresh female flowers (the ones with small fruits at the base). Repeat as new flowers appear. Pollinated fruits start growing larger within several days. Gourds are mature when the tendril next to the stem turns brown and rinds are tough. Harvest with several inches of stem. Dry in a well-ventilated place.
Regular price $3.69Sale price $3.69Unit price per -
Certified Organic Pink Oyster Mushroom Growing Kit
You’ll find lots of ways to use meaty and dense Pink Oyster mushrooms. Simply sauté in butter or olive oil, then add to cooked vegetables, rice dishes, egg dishes, soups, stews and sauces. Once sautéed, you can add to burritos or for topping pizza.
These pearly-pink mushrooms are silky when cooked and perfect for slow braising, so add them anytime you make a pan sauce. We love them gently fried, then topped with our favorite freshly chopped herbs for a delicious savory toast topping.
This well-crafted growing kit has easy to follow instructions and contains everything you need for plentiful certified organic Pink Oyster mushrooms.
Regular price $29.95Sale price $29.95Unit price per -
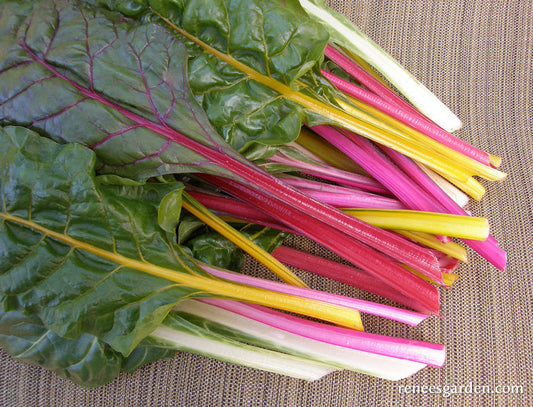
Heirloom Chard Garden Rainbow
START SEEDS OUTDOORS
In early spring, when danger of frost is over, sow seeds in well-worked, fertile soil in full sun. Sow seeds 1/2 inch deep and 1 inch apart in rows 10 inches apart, or broadcast thinly for bed planting. Firm soil well over these irregularly shaped seeds to ensure good germination. If first sowing germinates unevenly, plant more seed as seedlings catch up quickly. When large enough to handle, thin seedlings to final spacing of 8 to 10 inches apart so these large plants have room to grow and mature. Transplant extras or enjoy young thinnings as early greens and salads.
GROWING NOTES
Chard grows well in a wide range of conditions and can take some light frost. In mild winter areas, it can be grown year round. Give seedlings enough room, because chard grows into large vase-shaped plants 2 feet tall.
HARVEST AND USE
Begin harvesting when plants are well established and have at least 6 to 8 leaves. Both stalks and leaves make great eating. Chop and steam or sauté with garlic and olive oil. Use like spinach in lasagna or minestrone soup. Try tasty chard leaves stuffed and poached in broth with a dash of olive oil and fresh lemon.
Regular price $4.89Sale price $4.89Unit price per -
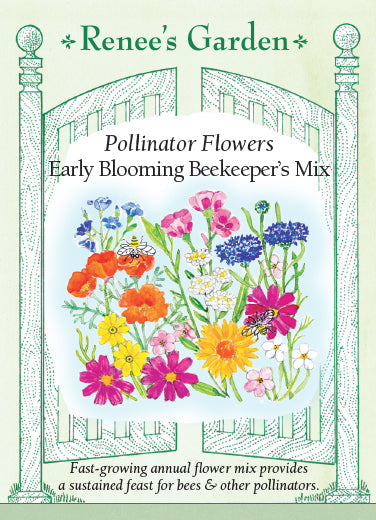
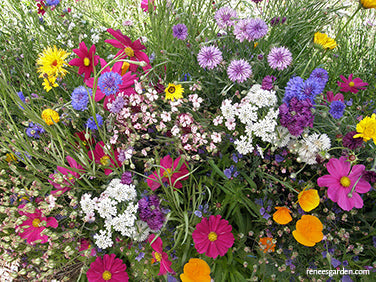
Pollinator Flowers Early Blooming Beekeeper's Mix
ANNUAL
Spring/summer bloom
Frost tenderBEST TO START DIRECTLY OUTDOORS
In early spring, after all danger of frost is past, plant in a well-prepared garden bed in full sun. Shake packet to mix. Scatter the seed thinly and evenly over finely worked soil, aiming to have the seeds about an inch or so apart. Cover lightly, about 1/4 inch deep, and gently firm the soil over the seeds—a rake is handy for this step. Water thoroughly and evenly with a very gentle spray. Keep the seedbed moist while awaiting germination and while flowers are actively growing for the most blossoms.
GROWING NOTES
This fast-growing, early flowering annual mix blooms in succession and provides a sustained feast for bees and other pollinators. The many flower colors and shapes blend beautifully for bouquets.
Regular price $3.99Sale price $3.99Unit price per -
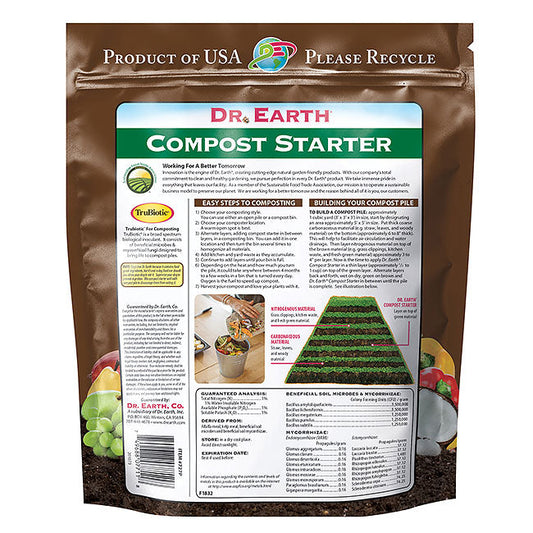
Premium Compost Starter With Mycorrhizae
Dr. Earth Compost Starter is an easy and effective way to significantly speed up the breakdown of raw materials in your compost pile. Infused with five different strains of beneficial soil microbes, simply sprinkle ½ - 1 cup of activator on top of your green layers to break down food and garden waste faster - it couldn't be easier to use.
We compared Dr. Earth Compost Starter side-by-side with a bin using no activator and the result was smoother, crumblier and visibly richer “black gold” that was ready to add back to the garden and bring life to our soil.
Ideal for all types of composting strategies: piles, bins, barrels and any other method. Sustainably made in the US, it’s pet and people safe and contains no synthetic ingredients or chicken manure. Odor-free.
3lbs.
Regular price $19.95Sale price $19.95Unit price per -
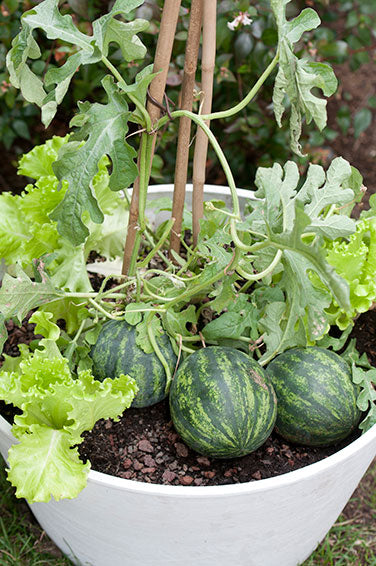
Personal Size Watermelons Mini Love
START SEEDS OUTDOORS
Plant heat loving watermelons only when spring weather is warmed and night temperatures are consistently above 55°F (13°C). Amend soil well with aged manure or compost. Sow seeds 1 inch deep and 4 inches apart in slightly mounded hills that are 3 feet apart, sowing 4 or 5 seeds in each hill. Thin to the three strongest seedlings in each hill so plants have room to grow and mature. Or, grow 1 plant per foot in rows.
FOR CONTAINERSSow directly into containers at least 18 inches wide and 12 inches deep. Sow 2 seeds in the center of the pot, then thin to just 1 strong seedling per pot. For larger containers, grow plants at final spacing of 8-10 inches apart.
GROWING NOTESProtect seedlings from marauding birds with plastic berry baskets, removing before plants get crowded. Feed container plants every other week with a liquid, all-purpose fertilizer. A good mulch will aid shallow rooted watermelon plants, which require ample and consistent moisture in hot dry weather. Avoid overly wet or dry periods for good quality fruit. In hot dry weather, check and water plants in containers daily.
Pick melons when the tendril closest to the fruit turns brown, and the light patch on the bottom of the melon changes from cream to tan. Watermelons keep well in the refrigerator, even after being cut open.
HARVEST AND USERegular price $4.99Sale price $4.99Unit price per -
Mini Cantaloupe Sugar Cube
STARTING SEEDLINGS OUTDOORS
Melons need full sun, rich soil and warm temperatures. Plant only when weather is warm and settled and temperatures stay above 50° (10°C). In rows 4 feet apart, sow groups of 2 to 3 seeds every 2 feet. After germination, thin to the strongest seedling per group, so you end up with one plant every 2 feet. Or make slightly mounded hills, 2 feet in diameter and 5 feet apart, sowing 5 or 6 seeds in each hill. Thin to 3 strongest plants.
TO START EARLY INDOORS
Several weeks before last frost date, sow seeds in individual pots of seed starting mix. Keep warm and moist, and provide a strong light source until weather warms enough to transplant outdoors.
GROWING NOTES
Amend soil well with aged manure or compost. Where summers are short or cool, lay down black plastic to retain heat, and plant into holes made in plastic. Where insects are a problem, cover seedlings with floating row covers to exclude them, removing when plants blossom. Keep young vines well watered and fed, tapering off water as fruits ripen up.
HARVEST AND USE
Pick when little melons are fully colored, fragrant and “slip” or pull easily from the vines. With their abundant fruits, small size and sweet, deep orange flesh, Sugar Cubes are true summer treats – the whole family will enjoy these delicious personal sized melons!Regular price $4.99Sale price $4.99Unit price per